Filters
The request grid can often contain hundreds or even thousands of records, making orientation and processing more challenging. To help you narrow down the list, you can use filtering tools. They allow you to display only the requests that meet specific criteria—for example, by their current status, assigned role, tag, or any combination of these conditions.
Filters help you find what matters most in just a few seconds. They speed up daily work, save time when searching for requests, and make it easier to navigate long lists. Whether you are approving invoices, checking agendas, or monitoring process progress, the right filter helps you stay focused on what’s important.
Xeelo offers two main types of filtering: basic filters, which enable you to quickly display requests by role, status, or tag, and custom filters, which allow for more advanced data manipulation. Each type has its own advantages, and you can easily combine them to suit your specific needs.
On the right side of the page, you’ll find a button to open the filter panel. Selecting it displays options for filtering requests by different criteria. If the panel is already open, selecting the button again hides it.

If the panel is hidden while one or more filters are active, an indicator showing the number of active filters appears next to the button. This way, you always know that the displayed list has been narrowed, and you can easily check which filters are currently applied.

Basic Filtering
Basic filters offer the fastest way to navigate the request grid, displaying only the records that matter most to you. Without setting up custom conditions or creating complex queries, you get an instant overview. With just a few clicks, you can display requests waiting for approval or tasks assigned to a specific role.
If you need more advanced combinations of conditions or custom rules, use custom filters.
For basic filtering, you can use these options:
- Status – filter requests by their current status in the workflow.
- Role – display requests assigned to a specific role.
- Tag – show only records that match a selected tag.
- Search – quickly find a request by entering text.
- Sort – order requests by a chosen field (for example, creation date or priority).

These filters are integrated into every object and automatically adjust to the current content. They only show values that can actually be filtered at the moment. For example, if no request is assigned to the Approver role, that option does not appear in the list. This keeps filters clear and always context‑relevant.
Speed up your work and keep the interface clean
If you know you won’t use some of the basic filters, such as Role, Status, or Tag, you can easily hide them.
In the top‑right corner of the filter panel, select the gear icon and clear the check boxes for filters you don’t need.
This makes the interface simpler and also speeds up data loading, especially useful when working with large grids.
Basic filtering is ideal for everyday work. It helps you stay organized, speeds up navigation, and lets you react quickly to active tasks. Whether you handle dozens or hundreds of requests, the right filter saves you dozens of clicks and minutes each day.
What’s waiting for approval in Accounting? Just a few clicks and you’ll know
Do you need to quickly view all requests currently awaiting approval by a specific role, such as the Accounting team? Basic filtering lets you find these records in just seconds, without creating a custom filter.
In the request grid:
- In the Role list, select Accountant.
- In the Status list, select Waiting for Approval.
You’ll instantly see all requests currently assigned to accountants and pending approval.
Role and Status
Filtering by role and status is one of the most common ways to stay on top of your request grid and focus on what matters. It lets you display only the requests waiting for your action, target records assigned to a specific team, or monitor how requests are distributed across workflow steps. Alongside everyday operations, it also provides a strategic view of the current state of requests, who is responsible for them, and where potential delays may occur.
The drop‑down lists for Role and Status are dynamic. They show only the values currently present among available requests. For example, if no request is assigned to the Accountant role or none are in the Saved status, these options won’t appear. This keeps the selection clear and relevant.
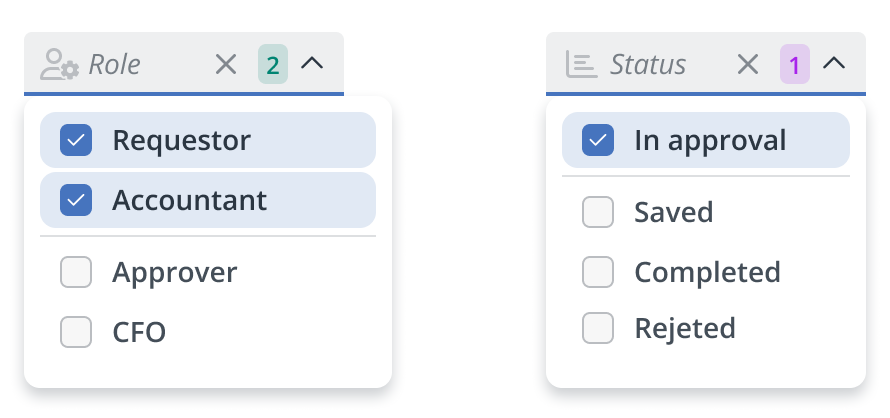
You can select multiple roles or statuses at the same time. In that case, the logical function OR is applied, so the grid displays all requests that match at least one of the selected values. This is useful if you want to see all requests waiting for approval, regardless of who is responsible.
When you combine different filter types, for example, Role and Status, the logical function AND applies, which means the grid shows only requests that meet both conditions at once. For instance, requests assigned to the Accountant role AND currently in the In Approval status.
Filtering by role and status applies to the entire database, not just the records currently displayed in the grids. This ensures you always see a complete set of results, without missing requests due to display limits.
Note
The default grid view displays up to 1,000 requests.
If you need to work with more records, apply filters that narrow the results so the total stays within this limit. This reduces system load, improving display performance and loading speed.
Tags
Looking for a specific type of document? Tags can help
Do you need to display only certain types of requests, for example, all invoices marked as Advance Invoice?
With tags, you can do that in just a few seconds.
If your form includes a field configured by the administrator to generate tags—for example, a field that defines the type of invoice—the system automatically creates tags from its values.
In the filter panel, simply select the tag that matches the type you need.
This provides an instant overview of all related records without requiring manual scanning of each item. Tags make navigation faster and let you group requests by meaningful categories.
Using tags improves clarity, helps you focus on specific areas, and saves time when navigating through long lists of requests. Tags ensure quick orientation and allow you to group requests into meaningful categories such as request type, department, year, or company.
Tags are not created manually. They are generated automatically based on the values entered into specific fields within a request. If a field is configured in the admin environment for tag generation, entering a value in that field creates the corresponding tag. That tag then appears in the filter panel and can be used for quick navigation.
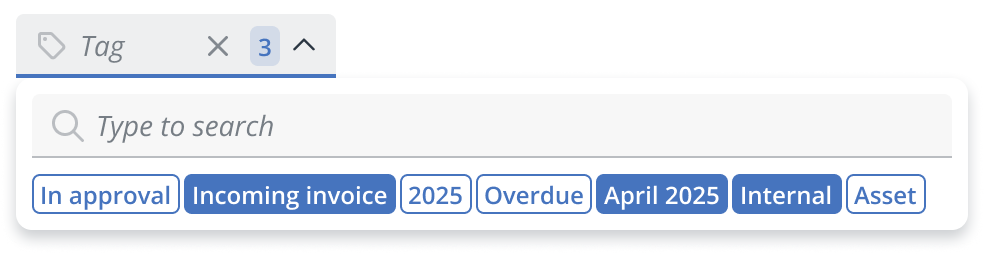
The tag list only shows values present in the currently displayed records. For example, if none of the visible requests are labeled with the tag January 2025, that tag won’t appear—even if it exists in the system. This keeps the selection always up to date and easy to read.
Unlike filtering by Role or Status, which searches the entire database, tag filtering applies only to the records currently loaded in the grid.
For example, if the grid shows 1,000 requests (the default limit), the filter applies only to that subset. For more accurate results, combine tags with other filters such as Role or Status.
If you select multiple tags at once, the logical function AND is applied. The grid then displays only the requests that contain all selected tags at the same time.
Search and Sort
Need more details? Use search and sorting
From the previous examples, we’ve already filtered all requests waiting for approval, assigned to the Accountant role, and marked as an Advance Invoice.
Now you need to see them in a specific order or quickly locate a single record.
To view requests in order, for example, by newest first or by priority, use the Sort function.
Select the down arrow icon next to the search field and choose the field you want to sort by.
To quickly find a specific request by name, invoice number, or another key detail, use the Search function.
Just enter part of the text and press Enter.
By combining filters, search, and sorting, you have full control over what appears in your grid—and you’ll always find exactly what you need.
Search
If you know exactly what you’re looking for, such as a request name, order number, or part of a note, the fastest way is to use the search field in the top‑right corner of the filter area.
Enter a keyword and press Enter to start the search. The system scans only the fields designated by the administrator as searchable.

The list of searchable fields appears automatically when you hover over the search box, so you always know where the system will look for your keyword.

Like tag filtering, both Search and Sort work only with the records currently displayed in the grid.
If the system shows 1,000 requests (the default limit), the function applies only to that subset.
Sort
To display requests in a specific order, for example, by newest first, oldest first, or alphabetically by name, use the Sort function.
You’ll find it next to the search field, represented by a down arrow icon.

Select the icon to open a list of predefined fields available to you, as configured by the administrator. Choose one, and the grid updates immediately.
Clicking the same field again switches the order from ascending to descending and back.
The current direction is also indicated by the icon next to the selected field.

To remove sorting, select the cross icon next to the active criterion. The grid then returns to its default order.
Like the search function, the Sort function works only with the currently loaded data.
If the default limit is active (for example, 1,000 records), sorting applies only to that set.
For more accurate results, combine sorting with filters to narrow down the list.
Custom Filters
Everyone works differently. Some users approve requests, others monitor processes, while others prepare audit reports.
Regardless of the task, you need quick access to the right data and information.
Custom filters allow you to tailor the request grid to your exact needs, eliminating the need to set the same conditions each time. You can apply them instantly, save them for later, or share them with colleagues for a common view of the data.
Whether you need records by request type, priority, completion date, or a combination of these, custom filters help you find everything in seconds.
How Custom Filters Work
Custom filters narrow the request grid based on precisely defined criteria. You can filter by fields explicitly made available by your administrator, along with system fields such as request author, priority, creation or modification date, and more.
- If you use the same field multiple times in one filter (for example, request status = Approved and Saved), the logical function
ORapplies. The grid shows all requests that meet at least one of the conditions. - If you use different fields, the logical function
ANDapplies. The grid displays only requests that meet all conditions simultaneously.
High‑priority requests created before a specific date
Do you need to focus on older requests with higher importance that may have gone unnoticed?
A custom filter lets you easily combine conditions to find exactly what you need.
Create a custom filter where:
- In the Priority field, select High and Medium.
- In the Created field, set the condition before May 1, 2025.
The result shows only requests with High OR Medium priority AND created before that date.
This combination helps you identify requests that require attention.
Creating a Custom Filter
To create a new filter, first open the filter panel on the right side of the screen.
If the panel is already open, selecting the button again hides it.
In the panel, choose Custom Filters.

A dialog box opens with two tabs you can switch between:
- Existing – shows all filters you’ve already saved. Select one to apply it instantly without additional setup.
- New – create a filter from scratch if you need different criteria or a new selection method.

On the New tab, you can create a custom filter that matches your exact needs.
Two modes are available:
- Basic – For quick setup of simple filters that don’t need complex logic. Ideal for common conditions such as request type, priority, or creation date. If you use the same field more than once, the system automatically switches to Advanced mode.
-
Advanced – You can enable this mode manually by switching it on at the bottom of the filter window. The system also allows it automatically when you use the same field more than once in a filter. For example, if you want to find requests with the invoice type set to Prepayment or Credit Note. In this case, the system automatically applies the
ORlogic between these repeated conditions. This way, the results include all requests that meet at least one of the values. Use this mode when you need to work with data in more detail. It allows you to create more complex conditions, organized into separate groups.When you create multiple groups, the system applies the
ANDlogic between them. This means that the results must meet at least one condition from each of the groups. This approach enables you to combine different variants of selection within a single area and refine the results using additional criteria.For instance, you can find requests with the invoice type set to Prepayment
ORCredit NoteANDassigned to the role AccountantORManager.
After you choose the mode you want to work with, set up the filter conditions. A filter consists of several parts that define which data appears and how it is organized.
Filter Criteria
First, select the field you want to use for filtering. This can be any field made available by the administrator—such as Department, Amount, Request Type—or a system field like Priority, Created Date, Request Author, etc.
Show a list of system fields available for filtering
Request ID
A unique identifier for each request. Use it to find a specific record directly.
-
Type
Defines how the request was created or updated:- Created – shows requests created normally in the system.
- Modified – shows requests created as updates to existing data.
- Import – shows requests imported from an external source with no change type.
-
Priority – Indicates importance: Low, Medium, or High.
- Template – The template used to create the request.
- Action – Filters requests updated by a specific action.
- Status – The current workflow status, based on process configuration.
- Role – The role assigned to the request (for example, Accountant, Approver).
- Assigned To – The user currently assigned to the request.
- Requester – The person who originally submitted the request.
- Request Owner – Requests with an assigned owner.
- Request Observer – Requests with an assigned observer.
- Created By – The user who created the request.
- Created – The request creation date and time.
- Modified By – The user who last updated the request.
- Modified – The last update date and time.
- Completed By – The user who marked the request as completed.
- Completed – The completion date and time.
After selecting a field, define the condition (such as Equals, Contains, Starts with, or Is not empty) and enter the value.
The value may be text, a number, or a date, depending on the field type.
Sorting Criteria
In addition to filter conditions, you can set sort criteria to determine the order of filtered requests.

Select Add Criteria to open the list of available fields, such as Creation Date, Priority, Amount, or Request Name. Then choose the sort order:
- Ascending – From lowest to highest: earliest dates, lowest priorities, smallest amounts, or A–Z.
- Descending – From highest to lowest: latest dates, highest priorities, largest amounts, or Z–A.
If you add multiple sort criteria, the system applies them in the order in which they are listed. You can rearrange or remove them at any time.
Apply or Save
Once you’ve set all conditions, you can apply the filter immediately without saving it.
This is useful when you need a one‑time view. Just select Apply and begin working with the results.
If you expect to reuse the filter, select Save.
Enter a name so you can find it later. You can also choose whether the filter is private to you or shared with others in your company.
Sharing ensures that everyone uses the same filter and sees the same view of the request grid.
One filter for the entire team
If your team regularly processes the same type of requests, consider creating a shared filter instead of setting it up repeatedly.
For example, a filter that shows requests:
- with type Advance Invoice,
- status Waiting for Approval,
- assigned to the role of Accountant.
Save it as Advance Invoices for Approval and share it with your team.
Everyone will then work with the same consistent view.
Managing Custom Filters
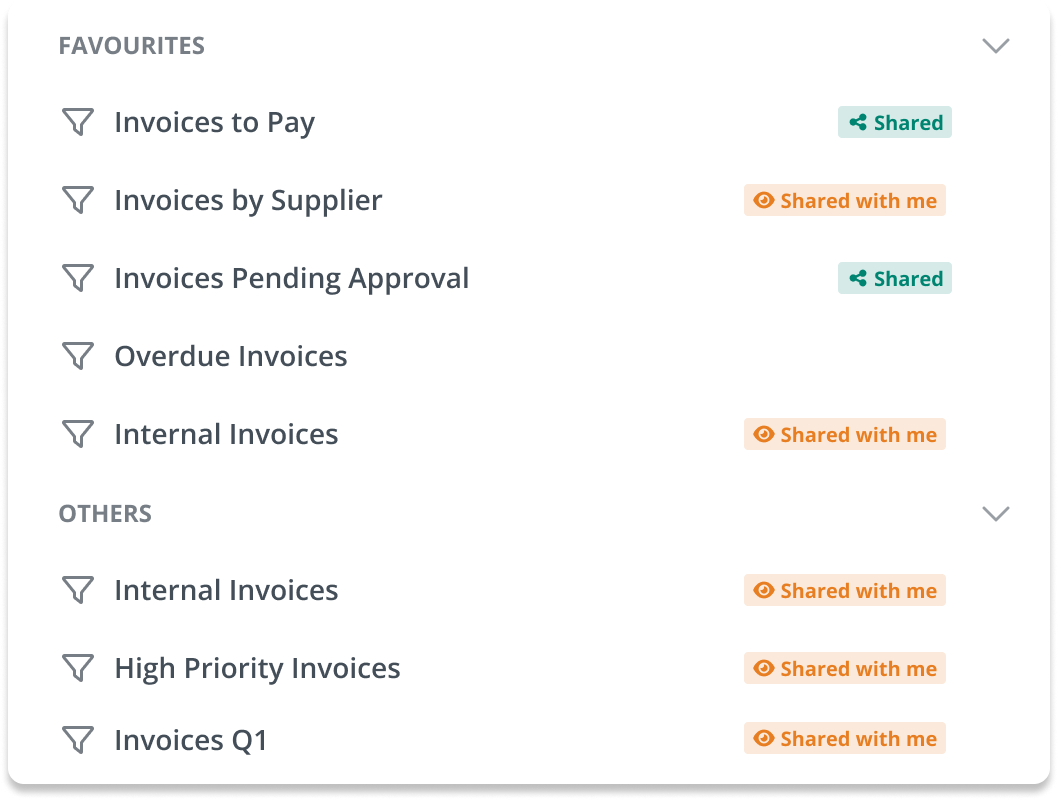
When you click Filters in the filter panel, a modal window opens. On the Existing tab, you’ll find all the filters available to you. Each filter may include a label that helps you quickly identify whether it’s shared by you or by another user.
If a filter has no label, it means you created it for your own use and haven’t shared it with others. Only you can see it, and other users can’t find or use it. This is useful for temporary working views or personal selections you don’t want to share with your team.
-
Shared – You created this filter and chose to make it available to others. Any user can then add it to their own filters and work with it—for example, as their default view or as a source for dashboards. This is an ideal way to unify how your team views requests.
-
Shared with me – This filter was created by another user and shared within the company. You can use it as needed—for example, for filtering, dashboards, or as your default view. However, you cannot edit the filter’s structure.
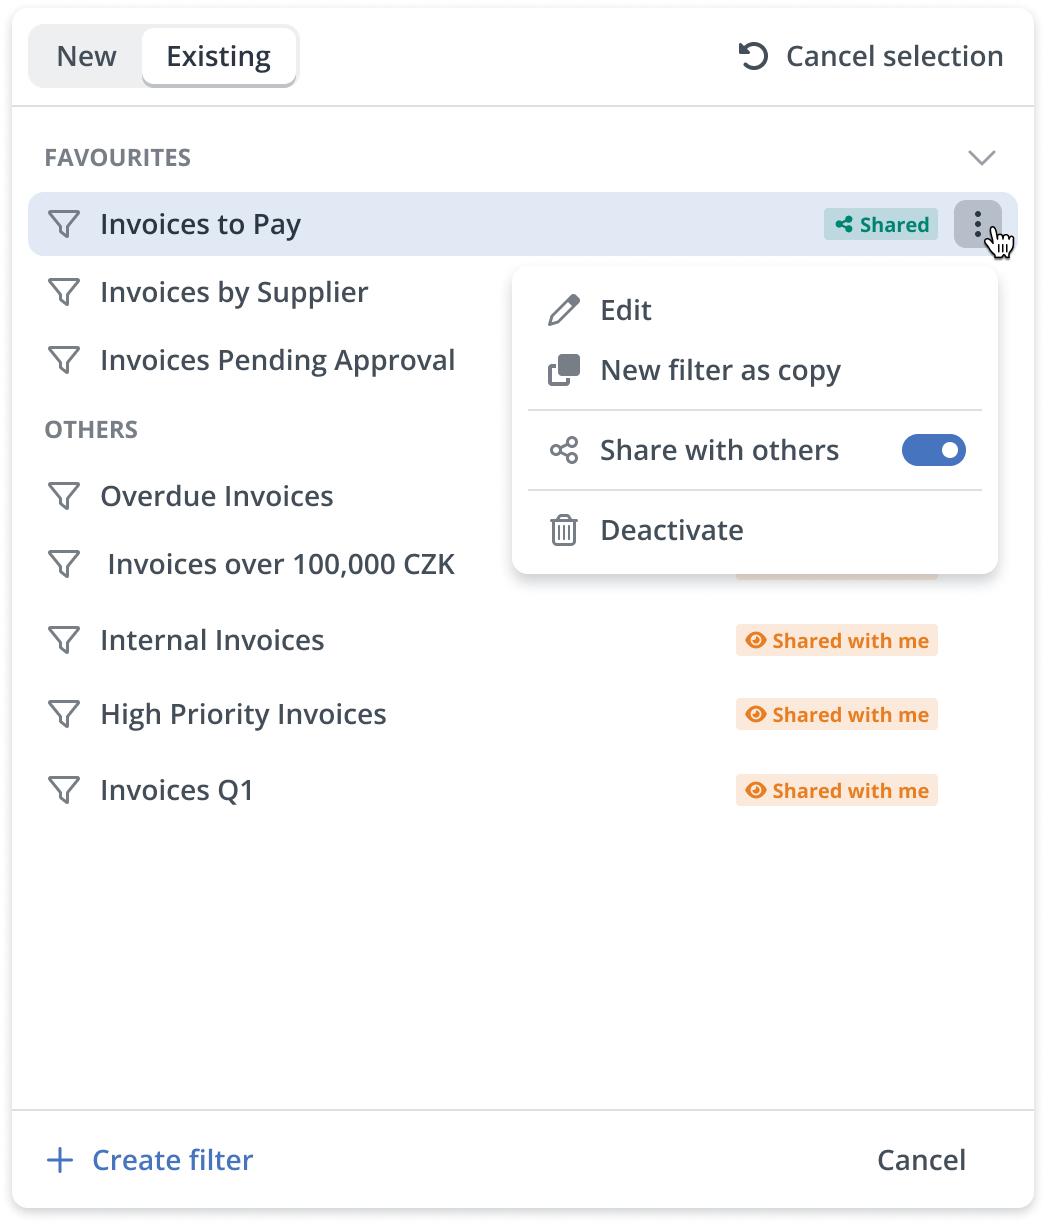
When you hover over any filter, a three-dot menu appears on the right. Clicking it opens an action menu, which differs depending on whether the filter is in Favourites or Others.
Favourites
-
Edit – Opens the filter editor, where you can change the name, adjust conditions, or switch whether it should be shared with others. This option is useful if you need to adapt a filter to new requirements without starting from scratch.
-
New filter as copy – Creates a brand-new filter with the same settings. You can then modify and save it as a different version without affecting the original filter.
-
Share with others – Determines whether the filter should be available to other users in the company. When enabled, others can add the filter to their own list and use it, but they can’t modify it.
-
Deactivate – Permanently removes the filter not only from your list but also from the lists of all users who previously added it. Once deactivated, the filter is no longer available and cannot be restored.
Others
-
Preview – Opens the filter in a read-only mode. You can view its settings, but you cannot make changes.
-
New filter as copy – Lets you create your own version of a shared filter. You can then edit it freely without affecting the original shared version.
-
Add to favourites – Saves the filter to your Favourites section, so it’s always within easy reach without having to search for it again.

Using Filters on the Dashboard
Beyond the request grid: use filters on your dashboard
From the previous example, you have already saved and shared the custom filter Advance Invoices for Approval.
Now you can also use it outside the request grid, for example, when configuring widgets on your dashboard to automatically display relevant data.
As a member of the Accounting team, you can add widgets such as:
- Task / Item – Instantly shows all current advance invoices waiting for approval.
- Item Count – Displays the total number of those invoices.
When setting up each widget, simply link it to the saved filter.
This way, you’ll see exactly the data you need—whether you want a quick overview, a volume check, or a space for detailed work.
The dashboard provides a personalized overview of the most important information you need to follow every day, without needing to browse multiple sections or search for specific requests. With widgets, you can display request lists, counts, or summary values, all based on conditions that matter to you.
That’s where filters come in—both basic filters (such as Role, Status, or Tag) and the custom filters you’ve already set up and saved.
Each widget allows you to select a filter to define which data appears on your dashboard.
Filters significantly increase efficiency, whether you need a quick overview of current requests or want to display only a specific part of your agenda.
Share your dashboard with others
You can personalize your dashboard to suit your own needs, but if it’s intended for the whole team, you can also share it.
This way, all team members see the same view with identical widgets and filters.
Shared dashboards are well-suited for team boards, reporting overviews, and real-time monitoring agendas.
Tips and Recommendations
Filters are among the most powerful tools for working with requests in Xeelo, whether you want to quickly locate tasks, track agenda status in real time, or prepare a shared overview for your team.
To make sure filters truly help and don’t remain just a one‑time tool, follow these best practices.
These tips will help you get the most out of filters while maintaining clarity and consistency across your team.
Give filters clear and meaningful names
The filter name is the first thing you and your colleagues see, so it should be descriptive and easy to understand.
Avoid abbreviations that others may not recognize.
Instead of naming a filter AD-INV-2025, use Advance Invoices for Approval.
A clear name saves time and prevents misunderstandings.
Share filters to align your team
If your team often works on the same agenda—for example, approving invoices or reviewing incoming orders—create one shared filter.
Every team member can add it to their list and instantly work with the same data.
This simplifies coordination and keeps everyone focused on what matters.
Use filters on your dashboard
Once you’ve created a filter, link it to a widget on your dashboard.
This way, you can instantly view the data you need without having to set anything up again.
A great way to start your day with the right overview.
Keep your filter list organized
Don’t keep a long list of filters you no longer use.
Review them regularly, remove or update outdated ones, and keep only the relevant filters.
If you share filters, this also helps your team navigate more easily and stay aligned.
Speed up grid loading with filter display settings
If you don’t need some filter types—such as Role, Status, or Tag—you can hide them.
In the top‑right corner of the filter panel, select the gear icon and clear the check boxes for filters you won’t use.
This not only makes the interface cleaner but also significantly speeds up loading, especially helpful in large grids or views with complex calculations.